Getting Started
Welcome to the Grizzly Industrial Workshop Planner, an easy-to-use tool designed to help you select the right tools for your workshop. Once you’ve launched the Workshop Planner, your first step is to choose how you would like to begin.
Create a room
This is the first screen you see after you launch the workshop planner. If you can already see a blank grid on your screen you may have already passed the ‘create a room’ screen. You can still create a new room, simply click here to learn how, otherwise:

Simply enter the length and width of the room you wish to create, then click "ok". The Workshop Planner will then draw the walls for you, and you can start planning your space. Its that easy to get started!
Login
If you’ve used the Workshop Planner before, have registered and saved plans, simply click on the Login button in the upper right area of the screen, enter your username and password, and the floor plans you’ve saved will appear in the saved plan list.
Defining your workshop shape
You can easily outline the shape of your workshop by clicking on the corner points of the walls and dragging them until the shape of you workshop is complete.

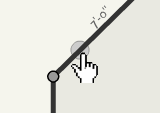
Adding wall points (corners)
If you want to add wall points, or corners, simply place your cursor over any wall line. You will see a faded circle appear. Click to add another wall point (or corner) that you can move and place where you would like to.
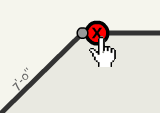
Deleting wall points (corners)
Deleting wall points is easy. Simply place your cursor over the wall point you would like to delete until the small X with a circle around it appears. Click on this X and the wall point will be deleted and the line will be connected from the two remaining points.
Adding interior wall segments
If you need to add partitions, or interior wall segments, simply open the structural menu located on the left side of your screen and scroll down until you see the wall icon. Click to place the icon on your floor plan and then rotate or scale the icon until it is positioned to your liking.
Adding tools to the floor plan
To add tools, structural and miscellaneous items to your floor plan simply select the icon of your choosing from the menus on the left. You can either click on these icons, which will add them to the floor, or simply click and drag the icon to your floor plan.

Manipulating tools on the floor
Arranging the tools on your floor plan is as easy as clicking and dragging the icon to the position that suits your needs.
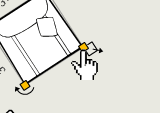
Rotating icons on the floor
To rotate the tool icons place your cursor over the icon until small handles (dots) appear around the icon. The corner dots (except the ‘i’ with the circle around it) can be clicked and dragged to rotate the icon into the desired degree of rotation.

You may also click on the ‘i’ in the corner to bring up the control panel for this icon. From within the control panel you can set the degree of rotation or move the line in the circle until the desired object rotation is achieved.
Re-sizing icons on the floor
To resize the tool icons place your cursor over the icon until small handles (dots) appear around the icon. The dots located on the left, right, top and bottom of the icon can be clicked and dragged to resize the icon.
You may also click on the ‘i’ in the corner to bring up the control panel for this icon. From within the control panel you can enter numerical dimensions for the length, depth and height of the piece.
Control panel
The control panel allows you to perform several functions easily from a single location. Simply roll over the icon you would like to manipulate until the handles (dots) appear around the icon. A circle with an ‘i’ around it also appears in the lower right corner of the icon. Click on this ‘i’ to open the icon control panel.
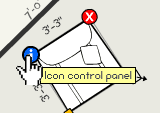
Once the control panel is open, you can rename the icon, change its dimensions, and adjust its degree of rotation. Once you’ve made the changes you want, simply hit OK.
Measuring on the floor
An important part of space planning is the ability to measure the distances between two points on the floor plan. To do this in the Workshop Planner select the measuring tape tool, located just below the pointer tool to the right of the product selector.
Once you’ve selected the measure tool click on the location on the floor plan from where you would like to start measuring. You will notice this point is now anchored and a line follows your cursor. Now click to specify the second point of the distance to be measured. The line will lock between the two points and give you an accurate distance.
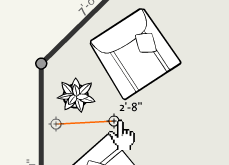
Click again to start a new measurement or click on the pointer tool located directly above the measuring tape tool to get out of measuring mode.
Zooming on the floor plan
The Workshop Planner provides the ability for you to zoom in an out of your floor plan to make more precise adjustments. To zoom select the Zoom In or Zoom Out tool (the magnifying glass icons with the + or –) located below the pointer and measuring tool.
Once one of the zoom tools has been selected, click on the floor plan where you would like to zoom. Clicking several times will zoom you in or out several levels.

A ‘fit’ tool is also available below the Zoom Out tool. When clicked, the fit tool will automatically zoom the floor plan so every item, including the walls fits within the view.
Scrolling the floor plan
As you plan your room, particularly if you zoom in for more precise placement of tools, you may want to move the floor plan up, down, left or right so the area you are working on is in the middle of the screen.
This can be achieved by using the scroll bars to the right and bottom the floor plan. Simply use the scroll bars as you would on any web browser by clicking the arrows, the scroll bar or the area between the scroll bar and the arrows to move the floor plan to your desired location.
Saving Plans
As with all applications, it is important to save your progress as you go to avoid losing your work and to recall your plans at a later time. Saving floor plans is easy. Simply click on the save button in the upper left hand of the screen and your floor plan will be saved. If you haven’t done so you may be prompted to register, login and name your floor plan. Once floor plans are saved they can be accessed from the saved room drop down list.
Registering
There are many features you can take advantage of by registering including the ability to save rooms. Registering requires only that you enter a unique username and a password. Make note of these when you register so you can pull up saved rooms at a later date.
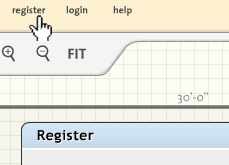
You can register at anytime by selecting the register button from the upper right hand side of the screen.
Save as
‘Save as’ is a function that allows you to save the current room you are working on as a new room. This allows you to quickly and easily create different layouts of the same workshop without starting from scratch each time. This function should also be used if you have made changes to a room that has been saved earlier to effectively save over the earlier version of the room if so desired.
Deleting Plans
The Deleting Rooms button in the upper left side of the screen allows you to do one of two things. When you hit the Delete Room button a small screen will ask you if you want to delete the entire room or just the icons.
Selecting delete the entire room deletes the entire room including the walls, all of the icons and the name. This room will no longer be available to you after you hit OK.
Selecting delete just the icons will delete all the tools from the workshop but will leave the walls as you designed them as well as the doors, windows and other structural items.
Selecting ok will execute your selection while cancel will do nothing.
Loading Saved Plans
As you save plans you can quickly access them by clicking on the saved room drop down menu located in the upper left area of the screen. Simply click on the drop down menu and all of your saved rooms will appear.

If you’ve saved plans but they do not appear, double-check to make sure you’ve logged in to the application!
Creating New Plans
At any point in the Workshop Planner you can quickly create a new room by clicking the New Room button in the upper left side of the screen. If you’ve been working on a floor plan you may be prompted to save your work before creating a new room. This is a good idea as any changes since your last save will not be saved if you don’t click OK.

Printing Plans
By clicking the print button located in the upper left side of the screen you can print your plan to any printers you have connected to your computer or network. The printed floor plan contains a picture of your plan, a list of the items in your workshop and additional information such as the dimensions of the workshop, the date it was printed and the name of the workshop.
If available as an option from your printers print window, select ‘Landscape’ so the plan prints as large as possible.
Emailing floor plans
A very powerful collaboration feature of the Workshop Planner includes the ability to email your floor plans to friends, family, designers, and virtually anyone you want to share your plans with. When the people get your email they will see any comments you include and a link to your floor plan.
When they click on the link in the email the Workshop Planner opens up with a copy. Don’t worry, they can’t change your floor plan - they’re just manipulating a copy of it. They can then view the plan and, if they want make modifications and send you a copy that you can save, delete or modify and send back. This feature is helpful if you want to share your plans with a friend, co-worker, your architect or a company rep if you have any questions.

To email your floor plan simply open the desired floor plan and click on the email button in the upper left hand side of the screen.
Emailing a company rep
After you have clicked the email button in the upper left hand side of the screen, a window will appear asking if you want to email a a company representative or a friend. Select the company representative.
You will then be asked to provide some basic information to help the representative better answer your questions. Only your name, email address or phone number, and comments are required. The other information is optional but may help the representative better respond to your inquiry.
In the comments field be as specific as possible about your question and hit OK. You have now emailed the company who will either call you are mail you back as quickly as possible.
Emailing a friend
After you have clicked the email button in the upper left hand side of the screen a window will appear asking if you want to email a company representative or a friend. Select a friend.
You will then be asked to fill in your email address, your name, the name of your friend and your friend’s email address. When you are sure everything is correct, hit OK and your friend will receive an email message with a link that will launch the Workshop Planner for them with a copy of your floor plan. It’s that easy!
Username/password
When registering please make note of your username and password in a safe location. Usernames and passwords are not retrievable.
If you are unable to recall your username and/or password you can create a new account and recreate your workshop.
If you have emailed your rooms to anyone simply ask them to email the room back to you.